Galaxy
This tools is available for installation to your local Galaxy [http://galaxyproject.org] from the Toolshed [https://toolshed.g2.bx.psu.edu/]. This section describes in some detail how this is done and how the Galaxy tool can be used to process data.
Primer
The Phenix Galaxy tool only enables you to filter VCF files and to convert VCF files into FASTA files. The mapping and the SNP calling component of Phenix need to be provided by other Galaxy tools (also available from the Toolshed.)
How to get your own Galaxy server:
If you already have a local Galaxy server on which you are an Administrator and on which you can install tools from the Toolshed you can skip this section and continue reading at “How to install Phenix to your Galaxy server”. If not you might want to get one, which is easy.
Prerequisites:
- A workstation running a Linux operating system
- Min. 4GB of RAM (better 8GB or more)
- Root access to that machine.
- git (optional)
- Python 2.6 or 2.7
- GNU Make, gcc to compile and install tool dependencies
The last three are standard on most contemporary Linux installations.
Get your own Galaxy:
Please go to [https://wiki.galaxyproject.org/Admin/GetGalaxy] and follow the instructions in the sections from “Get the Code” to “Become an Admin” (including).
How to install Phenix to your Galaxy server:
This page (https://wiki.galaxyproject.org/Admin/Tools/AddToolFromToolShedTutorial) describes the general procedure of installing a tool from the toolshed. Here is a click-by-click guide to what you need to do to install Phenix.
Prerequisites:
There is a small number of Linux packages that need to be installed on your machine, so that Phenix can be installed and run propery. These are:
- a C++ compiler
- a Fortran compiler
- the zlib development libraries
- the samtools package
The exact name of these packages and the commands to install them depend on yout Linux distribution. For Ubuntu, Mint and Debian Linux the required commands should be:
sudo apt-get install build-essential
sudo apt-get install gfortran
sudo apt-get install zlib-devel
sudo apt-get install samtools
On Fedora the commands should be:
sudo dnf install gcc-c++
sudo dnf install gcc-gfortran
sudo dnf install zlib-devel
sudo dnf install samtools
And on OpenSUSE the commands should be:
sudo zypper install gcc-c++
sudo zypper install gcc-fortran
sudo zypper install zlib-devel
sudo zypper install samtools
For more esoteric Linux distributions please refer to your local IT expert and/or Google. After you have successfully installed these packages, follow the instructions below.
- Make sure that you can access ftp sites from the command line running your Galaxy server. This is normally enabled by default, but sometimes requires an additional proxy setting. Try this command
wget ftp://ftp.gnu.org/gnu/libtool/libtool-2.4.tar.gz
If that does not download a file named ‘libtool-2.4.tar.gz’ to your current folder, speak to your local systems’ administrator.
- In your config/galaxy.ini files, set
tool_dependency_dir = tool_dependencies
- Restart your Galaxy
- In your Galaxy, click on ‘Admin’ in the main menu at the top.
- Select ‘Search Tool Shed’ from the menu on the left hand side.
- Click on the little black triangle (the context menu) next to ‘Galaxy Main Tool Shed’ and select ‘Browse valid repositories’.
- Type ‘phephenix’ [sic] into the search box and press Enter.
- You should see the “package_phephenix_1_0” and the “phephenix” repositories. Select ‘Preview and install’ from the context menu of the latter.
- Click ‘Install to Galaxy’.
- Type ‘PHE TOOLS’ into the ‘Add new tool panel section:’ textbox.
- Click ‘Install’.
- You will be presented with a long list of packages that need to be installed. This will take a while. Wait until everything is green. If nothing happens for a little while, try reloading the page.
In your admin tool panel the menu item “Manage installed tools” was added. You can check the status of your installed packages there.
You need to install two more tools that are part of the Phenix workflow:
- Browse the toolshed as before and look for ‘bwa’. Install the tool ‘bwa’ with synopsis “Wrapper for bwa mem, aln, sampe, and samse” owned by ‘devteam’. Put it into the ‘PHE TOOLS’ tool panel section.
- Browse the toolshed as before and install the tool ‘phe_samtools_mpileup’. Put it into the ‘PHE TOOLS’ tool panel section.
How to use Phenix on Galaxy:
- In the admin menu, go the ‘Manage installed tools’
- Find the ‘phephenix’ tool and click on it, not on it’s context menu.
- In the ‘Contents of this repository’ box at the bottom of the page, expand the workflows section using the little blue triange if necessary.
- Click on ‘Phenix workflow’ and behold an image representation of the workflow.
- Click on ‘Repository actions’ -> ‘Import workflow to Galaxy’
The Phenix workflow is now ready to use. You need to upload your data to a Galaxy history to use it. There are multiple options depending on your local Galaxy configuration. If you have followed the instructions above under ‘Get your own Galaxy’ the only available option is uploading from your local harddrive. When doing this, please make sure your fastq files are in the ‘fastqsanger’ format and your reference genome is in ‘fasta’ format. The basename of your R1 fastq files will be used as the name for the resulting bam and vcf files with appropriate file endings and will also appear as the sequence header in your resulting SNP alignment. Once your data is ready to use follow theses instructions to run the workflow.
Note
We have chosen reasonable defaults for filtering your VCF files for high-confidence SNPs (min_depth:5,mq_score:30,qual_score:30,dp4_ratio:0.9,mq0f_ratio:0.1). If you would like to change these settings please see the instructions below.
- Click on workflow in the top main menu and select ‘run’ from the ‘Phenix workflow’ context menu.
- Select your reference genome in the ‘Reference fasta’ selection box.
- Click both “paper stack” icons next to ‘R1 fastqs’ and next to ‘R2 fastqs’.
- Select all R1.fastq files in the “R1 fastqs” selection box that appeared. An easy way to do this is to type ‘R1’ into the text box immediately under the selection box. The selection box will automatically be filtered for fastq file names that match what has been typed into the text box.
- Do as above for the “R2 fastq” box.
Note
Make sure that the order of highlighted files in the R1 and R2 fastq selection boxes are corresponding, i.e. the first highlighted files in the top box will be run together with the first highlighted file in the bottom box, the second with the second and so on. Are the highlighted files in the same rank in both boxes always matching pairs from the same sample?
- If you are happy with the above, click ‘Run workflow’.
- Wait until three new history items per sample processed appear. These will be one bam file, one raw vcf, and one filtered vcf per sample.
- Click on PHE TOOLS in the tool panel on the left hand side and select the “VCFs to fasta” tool. This tool will create a multi-fasta file from your filtered vcfs.
- Select all files ending with filtered.vcf in the top file selection box under ‘Input VCF files(s)’, by holding down the Ctrl key.
- Click ‘Execute’. Once everything is completed the “VCFs to fasta” tool with have produced your SNP alignment that can now be used for further processing.
How to change the number of jobs running simultaneously?
Galaxy runs 5 jobs at the same time by default. This is appropriate for machines that have at least 5 GB of RAM and at least 5 processor cores. If you have more or less compute resources at your disposal you can change the number of concurrent jobs, if you rename the file config/job_conf.xml.sample_basic to config/job_conf.xml and change the “workers” setting in the file to the desired number. This requires a restart of Galaxy.
Advanced - Changing the Phenix vcf filtering settings:
- Click on workflow in the top main menu and select ‘edit’ from the ‘Phenix workflow’ context menu.
- Click on the ‘Filter VCF’ tool box to highlight it.
- The parameters for this tool can now be edited in the panel on the right hand side of the browser window.
- Use the little trash can in the top right corner of each individual filter to remove it.
- Use the button labelled ‘+ Insert SNP filter’ to add a new one.
- Use the drop-down menu to select a new filter type and the corresponding text box to set the threshold value.
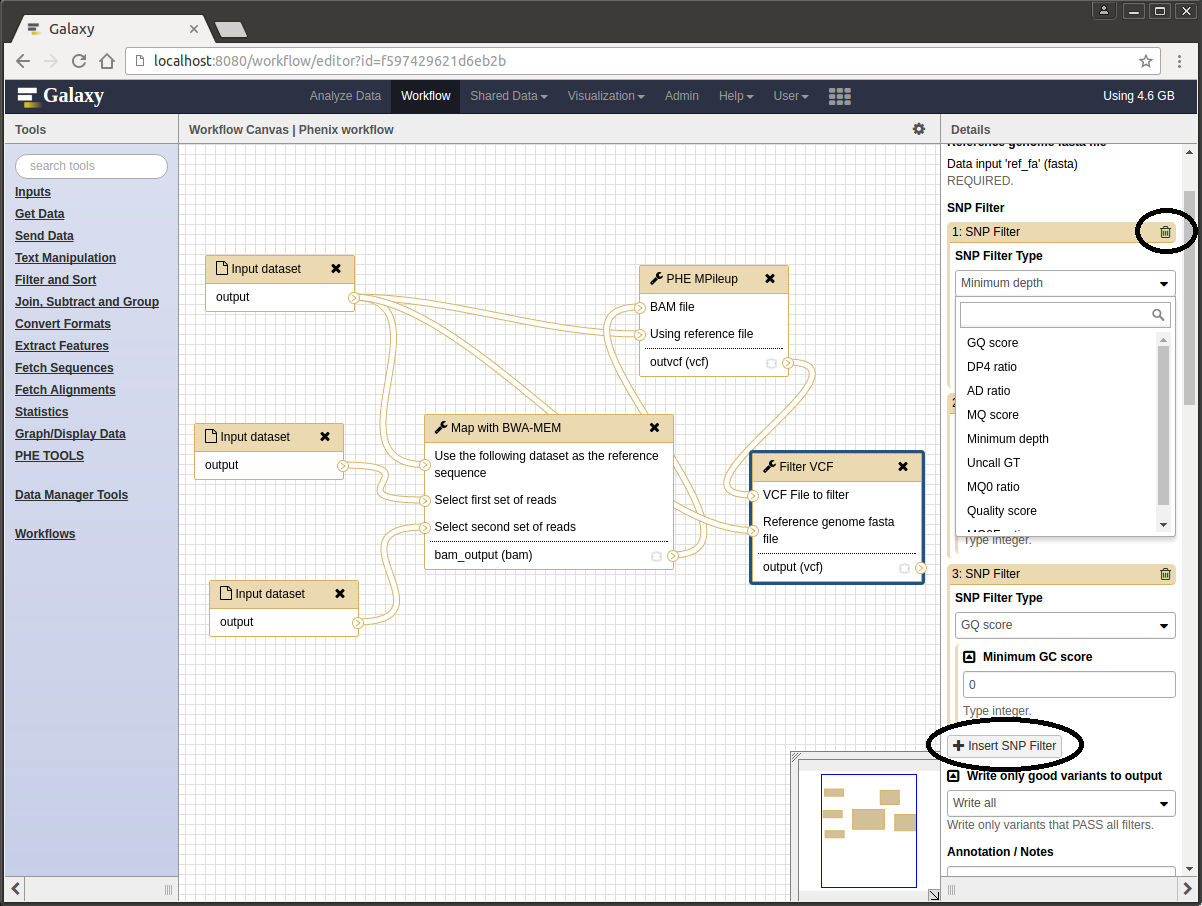
The Galaxy workflow editor.
Warning
Not all filters are suitable for all variant callers. Please refer to the table under Filters.